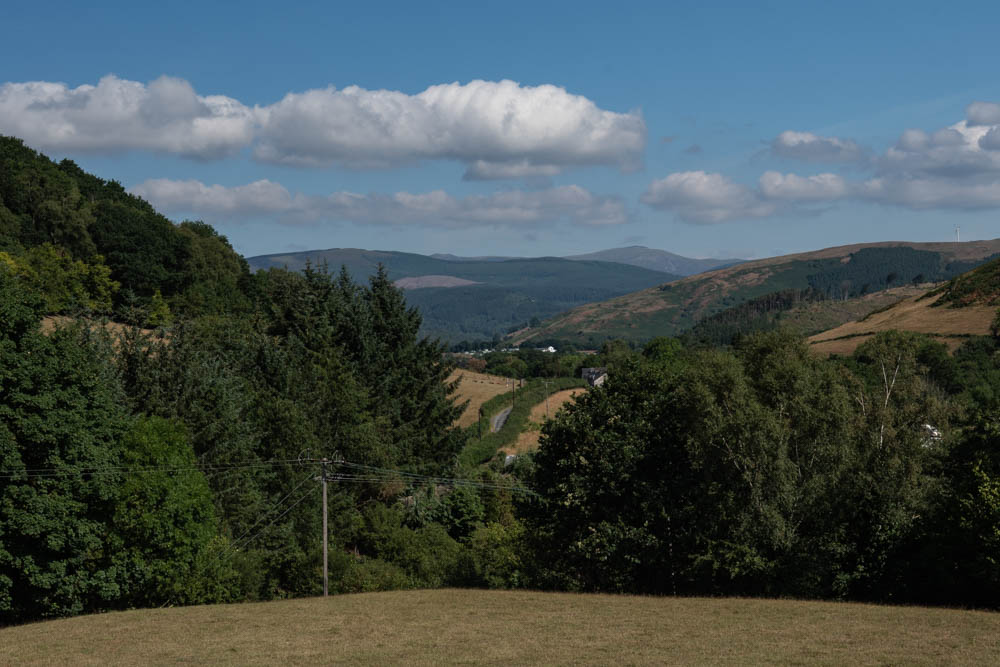
I’ve just added a new gallery to my website, containing photographs of a recent trip to Wales. You can find it here.
I’ve just added a new gallery to my website, containing photographs of a recent trip to Wales. You can find it here.
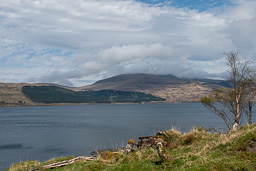
I’ve just added four new galleries to my website, containing pictures from our recent trip to Scotland. You can find them at:
 |  |
| Pictures of Mull | Pictures of Iona |
 |  |
| Pictures of Skye | Pictures of the Highlands |
Since my last post in October, we’ve done an awful lot. The time from October until we moved in in December (formally at 12:12 on 12/12/12) was a desperate rush, trying to get the new house habitable before our rental contract in Broadwoodwidger expired on 15 December. We achieved it, but only just, and we’ve now been living in the house for just over 3 months.
We have contracted with Matt Verney’s company, MV Gardens,to landscape the front and back gardens, working to an updated version of the scheme we submitted for planning permission. Matt did some preliminary work to allow us to move in, including levelling the driveway and laying compacted crushed stone (‘803’ – a magical substance) so that we could get to the front steps, doing the same outside the kitchen door, and fitting a temporary balustrade to the steps leading down to the front door. That was just enough to let us move in, and a bit more levelling allowed me to move my Porsche from Broadwoodwidger into the garage here.
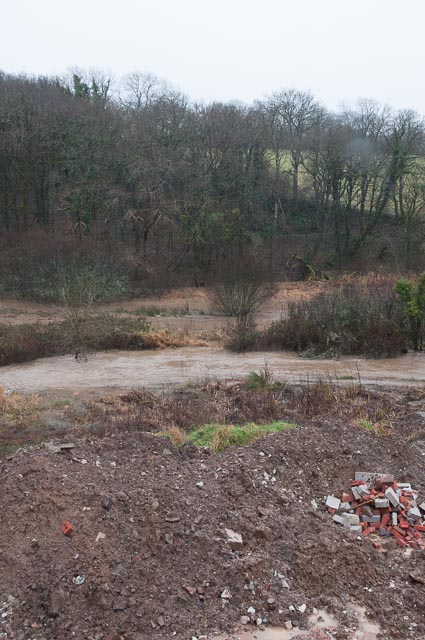
Then it was Christmas, and with it, a continuation of the biblical rain we’d had seemingly throughout the build. The garden still resembled the Somme, as in the picture above, and we resigned ourselves to continuing to live on a building site while we sorted out inside the house.
A lot has happened since, not all of it visible.
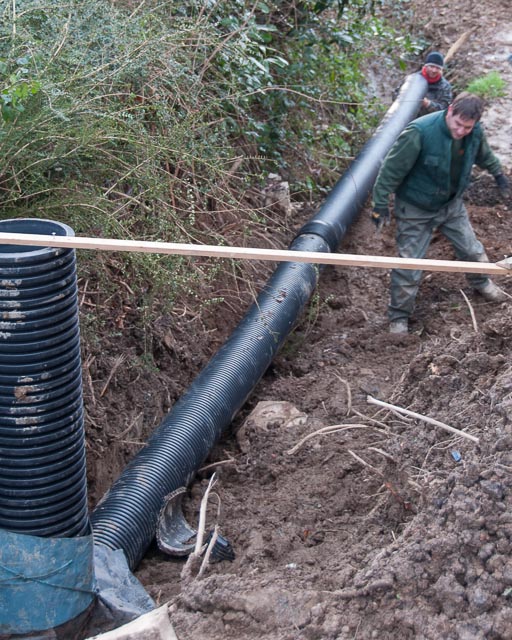
All the storm drains from the gutters in Westcroft Road find their way to the top corner of our site. Before we started building, the water simply ran down a ditch by the bank, into the river at the bottom of the site. As we built retaining walls and so on, we landed up with a substantial waterfall – the sound of rushing water was clearly audible in the living room! One of the early jobs was to put in a big (225mm diameter) drainage pipe to collect the rainwater and carry it down to the river. The picture shows Matt and Ben (in the background) putting the pipe in place. This has dealt with the storm water problem down that side of the site.
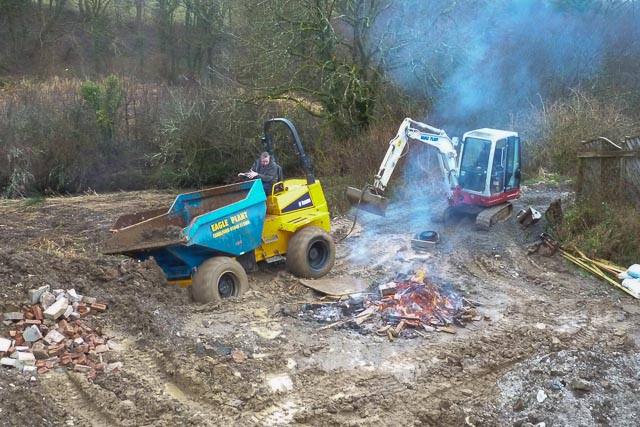
Matt’s next job was to lay 803 for the paving behind the house, and to move loads of spoil from the front of the house, and around the back garden. He set out to hire a 5-tonne excavator, and a 3-tonne dumper to help with this. In the event, Eagle Plant could only supply a 3.5-tonne excavator (not much of a problem), and a 9-tonne (!!) dumper – normally seen building motorways. It was HUGE. The picture shows me indulging big-boy fantasies when Ben needed help to drag it out of the mud where it was stuck up to its axles.

The rain continued right through December and most of January – and the garden continued to have that Somme look to it. At Christmas, the Germans cancelled the football match because of the state of the ground.
The cats, who had been in the cattery Cats in Clover while we moved were let out in January, after I’d fitted a (large-size) cat flap in the utility room door. They were not too impressed with the mud, but condescended to go out, then to come in and spread muddy footprints over every surface.
A lot more 803. We are well over the 100 tonnes now – for a time, we seemed to see a truckload every 5 minutes! Ben spent ages racing (?) around in the mega-dumper, slalom around the drain inspection covers, distributing piles of 803 around the garden ready to set out the patio base. Then we spent an hour or two in the pouring rain with Matt and a can of spray-line, marking out the outline of the patio behind the house. The goal was a single, sinuous curve right across the back of the house. I spent a couple of hours playing with Autosketch (the spline curve fit was useful, as, being an engineer, I can only draw straight lines by hand). Then Ben spent happy days spreading the 803, and compacting it with Matt’s ancient vibrating roller – he could only use it for about 20min at a time, then had to take a break for the vibration in his hands to fade away.
At the end of January, the sandstone slabs for the patio were delivered. Another huge load, delivered this time on a 40-foot artic lorry. Fortunately, the delivery truck came with its own fork-lift, and the driver spent a (for us) amusing hour whizzing from the lorry, parked half-way up Westcroft Road, to the bottom of the site with pallets of stone slabs. In the rain, of course! A couple of weeks later, and Paul (another of Matt’s men) came, to cut some of the large slabs for the steps at the front of the house, and to distribute the other slabs. He spent a Friday on the work, then came back on the Saturday with Sylv, his estimable wife – five-feet nothing, but carrying slabs around! They started at about 9 on the Saturday morning, using the powered track-barrow Matt had hired. At about 11, the track-barrow shed one of its tracks, and Paul and Sylv spent the rest of the day carrying slabs with no more mechanical aids than a wheelbarrow.

Tubs found that, when the sun finally came out, the sandstone was a good place to sunbathe.
Most recently, a further 32 tonnes – this time topsoil.
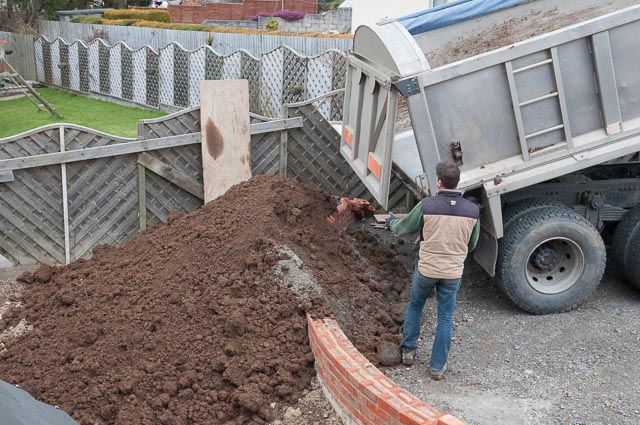
Paul has spent the last couple of days distributing soil over the bank outside the kitchen door. This will be planted with ‘Native Shrub Mix’. Matt refers to it as ‘Supermarket Car Park’, but the virtue is that it is low-maintenance, and will attract birds and pollinators. Matt has now laid about a third of the patio, enough to see that the sandstone will look terrific against the house brickwork, and Ben is now back at work, so the blockwork retaining walls are coming on again. The sloping path behind the garage is now started, and the weather is starting to help!
More soon.
The last week or so have seen fast progress inside the house, but a much more sedate, shall we say, pace outside. Three striking developments –
We’ve bought the kitchen from a local, Holsworthy, company, Complete Kitchens. On 24 September, they arrived and delivered a mountain of kitchen unit carcases (all packed flat). Over the week, Sean the fitter put many of them together, and also spent three days back in the workshop fabricating the Corian worktops. This last week has seen the kitchen come together.

There is still some work to do – only half of the doors are fitted, and there are more appliances to install – but next week should see the kitchen finished, and Sean moving on to the utility room.
…are coming along splendidly. Jason the tiler (and his mate Ian) did an excellent job of the tiling, and this week, Liam has been fitting the sanitary ware. Our en suite bathroom looks wonderful – the cabinet under the double washbasin is a perfect match for the dark grey tiles, and the room feels spacious


The Shower Room is also exactly what we had in mind…

The guest bedroom en-suite, though, is a catalogue of disasters

This started when (undetected by us at the time) Josh built the room 100mm narrower than planned – 1200mm rather than 1300mm. That came to light when Ryan tried to fit the shower tray. We were away at the time, and an ambiguous phone conversation with Sean (project manager) led to Mayflower being asked to swap the 1200x800mm tray for an 1100×900 one. We discovered that only when Liam was half way through fitting it. We decided that it would be OK, but it is rather tight. Then the lighting supply for the bathroom cabinet (and shaver point) was put on the wrong wall, behind the tall heated towel rail. Finally, Jason (tiler) had helpfully set the pipes for the towel rail exactly level, through tidy, small holes in the porcelain tiles, when one needs to be 20mm higher than the other to accommodate the T-piece that connects the radiator valve and electric backup element. What we’re hoping is that this acts as a sort of cock-up-black-hole, attracting all the disasters to one place. Think we’ll screw the door closed!
Liam has struggled with fixing things to the wall because the porcelain tiles are very hard. A standard tile drill lasts just 2 holes. Tom (Electrician) suggested Bosch Extreme; I gave Liam one to try, but have not yet heard how well it worked.
I went to site on Wednesday morning, expecting to do the usual round of checking for problems, only to find Andy (joiner) there, and a lorry delivering our stairs. 2 full pallets of stair components, all needing to be carried into the house.
Here’s the staircase jigsaw puzzle –

And no picture on the front of the box, either! Andy, who seems always to have a smile, didn’t seem fazed at all by this, though when I went to site again on Thursday, I did find him lining pieces of oak up in the hall, trying to work out what went where. He clearly sorted it out, though, as when we went to site on Saturday, we had most of the lower staircase.

And it’s beautiful! When I was on site on Thursday, Phil (other joiner) was standing at the bottom of the stairs, waxing lyrical about the beauty of the oak, and how the grain showed through. And it’s true – it is lovely timber, and it will work exactly as we intended, as a feature as you enter the house.

Some tense times here, as there were some key tasks that had to be complete this week so that the essential work planned for next week could happen. At last, at last, we have a water main into the house. Admittedly not where originally planned (plant room), but at least it’s in. And we have a duct in place for the electricity supply, so Western Power can come next week to connect up. And, finally, we have trenches

These will allow the borehole pipes (in the large brown pipes sticking out of the ground) to connect to the manifold (around the corner to the left)

and thence to the heat pump, which is due for delivery next week. Again, the garden looks like the Somme. I keep expecting Baldrick to pop up with a Cunning Plan.
Trenches also started (the one in the middle of the picture) for the drains. Helpful.
Lots of important stuff, as indicated above –
Now that the plaster and screed have had some weeks to dry, we can move on to finishing inside the house. We had decided on porcelain tiles for the floor in the kitchen, dining room, downstairs hall , utility room and WC, and in the all-important plant room, and for floors and most walls in the bathrooms. Before that could start, though, Ryan the plumber (or more correctly, his chap Liam) had to fit the shower trays and baths. That threw up one problem, when we found that En Suite 2 – the Guest Bedroom en-suite – had been built 100mm narrower than designed. Too late to do anything about the walls, we had to change the shower tray from 1200×800 to 1100×900. Dimensions are a bit tight, but it should be workable.
We selected two pairs of tile colours from the Gemini Hillock range (from CTD in Exeter) – Light Grey/Dark Grey and Cream/Mocca, and spent a fair time allocating the pairs of colours to floors and walls. I transferred the results into a set of drawings, one per room:


Jason Ogilvy very quickly tiled the ground floor, and moved on to the bathrooms.


We’re delighted with the tiles – they have turned out exactly as planned, and Jason and his mate Ian have done a grand job, getting the right colours and the right grout for each colour.
Potton delivered the 2nd fix joinery pack last week. This contained all the internal doors, the door hardware and material for the door casings, architraves and skirtings. Phil, the carpenter working for Andy Wilton, has been on site all week, fitting the doors and architraves. The skirtings will be left until the oak floor has been laid through most of the house.
The doors look superb..

All this week, Tom, Matt and Paul have been in installing the electrical fittings. We now have consumer units (fuse boxes) in the Plant Room and Loft, electrical sockets and switches throughout, and most of the light fittings, where we are using down lighters. Western Power are scheduled to connect the house to the supply on 8 October – another significant step.
On Monday last, Complete Kitchens delivered much of the kit for the kitchen, and started on the installation. They have had to pause while electricity and plumbing catch up, but the time has not gone to waste, as they have been manufacturing our Corian worktops.
Liam has been back again, installing the LPG supply for the hob in the kitchen, and adding some more water pipes.
On Monday, the decorators come in to start waxing the doors with Treatex painting the walls, leaving only the final coat. Monday also sees the delivery of 150m2 of engineered oak flooring, and work on the water supply to the house and drainage. Exciting times, and still on programme to complete in late November.

In July, the brickies had started laying the facing bricks on the outside of the house. I’d mentioned the difficulties of delivering bricks to site, and that we were then about to order special, cant bricks for the junction between the bricks and timber cladding. Nothing since has made any of that any easier, and the wonderful weather this summer has not helped.
As the bricks have gone up, we have been delighted with the look of the bricks themselves, and the job that Chris Cox’s men have done. The bricks dry (eventually, when the rain lets up for a while) to a varied light red. Whilst the rate of broken bricks is a bit high, there’s really nothing to suggest that they cost £200 less per thousand than the perfect article.
When the cants finally did arrive, the bricklayers could put on the final ‘soldier’ course. Ibstock, the brick manufacturer quoted 10 weeks delivery for cants in the Hamsey Mixed Stock brick, so we looked for an alternative. Ibstock suggested Cheddar Red, which is a more distinct red, and has a smooth (not sand-faced) finish. We thought that they would make a sufficient contrast to the Hamsey bricks, and decided to use them. So we ordered 700 cants, and a number of special specials for internal and external corners.

The picture shows the junction between the brickwork, with the cant bricks in place, and the timber cladding. The black strip at the junction is a lead flashing, to prevent water finding its way behind the cladding and into the wall cavity. Mark Allen did a nice job of cutting and laying the lead, finishing it with Patinating Oil. The corners were finished with fabricated leadwork…
There is a lot of detailing in the junction between the cladding and bricks. Thanks Josh.
The major remaining piece of brickwork was the chimney, and the chimney breast in the lounge. We plan to install a
Stovax Riva Studio inset log-burning stove, and took advice from Mark Broadhead, from Kenwyn Stoves in Great Torrington. Mark made some helpful suggestions, and I drafted a design for the chimney, drawing on data from the Isokern website. Isokern make pumice flue liners, that are the standard way of venting a log-burner. The design is shown below:

Ultimately, something like this was built, though not all the dimensions are the same (!). The space between the brick outer chimney and the flue liner is filled with insulation material. Mark Broadhead’s recommendation was a material called LECA (lightweight expanded clay aggregate), a much more stable alternative to vermiculite. Rangemoors who supplied the Isokern liner suggested we needed 33, 25kg bags of LECA, which seemed an awful lot, but…

The chimney threw up a few problems with the brickies. First, they built the internal chimney breast in Twiggy mode – no projection at all. Fortunately, we caught that early, and relatively little rework was needed.

Then they needed the scaffold altered to clear the chimney as it went up. That resulted in a certain amount of tension around August Bank Holiday, which was only resolved when the scaffolders returned to adjust the scaffold. Eventually, then, the chimney popped up past the roof ridge, and gained a chimney pot. A Proper House at last!

At this point, we could schedule the removal of the scaffold. All that remained was for the roofers to finish the leadwork at the top of the chimney, and to complete the ridge there.

This ran right up to the wire, with the roofers at the very top of one end of the scaffold while Nick Curtis’s men dismantled the other side. But then, on Monday 17 September, the scaffolding came down!
For the first time, then, we could actually see the outside of our house.

The last group of posts, at the end of July, had the house clad in scaffolding and work started on the brickwork outside, and all the walls lined with plasterboard inside. In the 6 weeks or so since then, a lot has happened. This is the first of three posts that bring things up to date now.
Since the end of July:
At the beginning of August, Damian the plasterer started work on skimming all the internal walls and ceilings.

The building is dry-lined, and, in principle, we could have simply taped and jointed the plasterboard. This would probably have been a bit cheaper, and would have reduced the drying time, but, even if it’s done well, it is still really difficult to make the joints invisible after painting. I know that I would be sitting in my armchair, and the fact that I could see the evening sun (?) glinting off every joint in the plasterboard would ruin my gin and tonic. So, we bought an awful lot – 56 bags – of plaster, and Damian spent a happy week skimming the walls with it.
Whilst the transformation was not as great as the dry lining – where the rooms were formed for the first time – having uniform, smooth surfaces adds to the impression of a house, rather than a building site.


The other job that Damian organised was laying the screed on the ground floor.
This involved mixing cement and some of the 16 tons of sand delivered earlier, then pumping the resulting mix into the ground floor where it was spread 65mm thick all over the floor. This covered up the underfloor heating pipes, and once set, avoided the need for nifty footwork while walking around downstairs!

The mixer and pump is the yellow machine at the right of the picture. Needless to say, it was a Perfect Devon Day. Needless to say, too, that we were left with a good 2 or 3 tons of surplus sand. Still, it adds a little variety to the spoil Himalaya.
With the plaster skim finished as far as possible at this stage, and the screed down, work inside the house had to pause while things dried. The screed dries at about 2mm/day, so needs about 6 weeks before tiles can be laid on it. We tried to speed this up a bit by placing two industrial dehumidifiers in the house, running 24 hours a day. Nice idea, but one of the 2 machines had a leak, which meant that it dehumidified the kitchen straight on to the kitchen floor! Still, I suppose it reduced the area that still had to dry.


This is how the house now looks from outside (Note the blue sky!)


Next week, apart from more work on the brick cladding, brings 16 tons of sand, 80 bags of plaster and more materials. These are for the ground-floor screed, then to plaster skim all the internal walls and ceilings.
With first-fix done, we could move on to boarding the walls and ceilings.
First, we got Mark to put mineral wool insulation in the ceilings and in the walls of some of the rooms (bathrooms, plant room), to give some acoustic insulation. Then, while the boarding started, he and his mate Jack put 180mm of mineral wool between the rafters in the roof, and 300mm in the small loft at the very top of the roof. This was a horrible, dusty, itchy job, but Mark and Jack got on and did it.
Peter (Project Interiors) and his gang took 4 days to cover all the walls and ceilings with plasterboard. At the end of this, we could see, for the first time really, the shapes of the rooms.


Our bedroom, showing the vaulted ceiling and roof-lights.


The hall and upstairs landing


The dining room and kitchen


The lounge

And, finally, the heap of scrap plasterboard.
Weather permitting, now that the roof was loaded, we could start on cladding the outside of the house. The tops of the gables, and a band under the eaves, are timber clad, the remainder clad in facing bricks.
Josh returned to fix the timber cladding (weatherboard) on the upper parts of the house.

The cladding on the gable to our bedroom.
The cladding is in a treated softwood, which looks like cedar but is both cheaper and retains its colour better. It is fixed with (fiendishly expensive) stainless-steel nails. Thus far, Josh has used 3,300 nails!
The corner details are important, and have been done very neatly, though no-one will see them close up once the scaffold is gone.

There is still one gable to complete, but the cladding already looks good.
The lower parts of the house are clad in facing brick, in our case, Ibstock Hamsey Mixed Stocks. These are red, sand-faced machine-made bricks. The first quote we had was £500/thousand, which caused an intake of breath. Fortunately, we found a second-grade version of the same brick (ATR, or “As They Rise), at about £300/thousand. When the house and garage will need about 20,000 bricks, that makes a substantial difference!
Brick deliveries have been difficult. The original plan, to deliver a full load (about 10,000) of bricks in one go foundered when it proved impossible to get the lorry close enough to the site. RGB, the builders merchants, have been very helpful, but, even so, craning the bricks a couple of packs at a time over the fence has been a trial. We hope to clear space at the top of the site, that will make access easier.


The bricklayers have been affected, too, by the appalling weather. They have spent too many days sitting in their car, waiting for the rain to abate. Fortunately, the last few days have been dry and warm, and they have made great progress.

We now need to order some brick ‘specials’ – cant bricks, with a chamfered corner for the final (soldier) course below the timber cladding.
We can now move on to finalise the design of the fireplace and chimney, which are the next major bits of construction.